I may get commission for purchases made through links in this post at no extra cost to you.
Indulgence meets creativity in this Chocolate Mousse Dessert recipe, where rich dark chocolate meets the lightness of whipped cream to create a velvety delight. Topped with playful garnishes resembling a crackling campfire, this dessert ignites the senses with every spoonful. With just a few ingredients and simple steps, you can craft a dessert that not only satisfies your sweet tooth but also sparks joy with its whimsical presentation. Gather your ingredients and prepare to embark on a culinary adventure that combines the decadence of chocolate with the fun of crafting edible flames.
Lag BaOmer
Originally I made this dish to celebrate Lag BaOmer. I wanted to share a recipe to fit the holiday spirit. But I found myself thinking about the holiday a lot, what does it Lag BaOmer even mean? Well, Lag BaOmer always takes place on the 18th day of the month of Iyar. So, the word “Lag" is made up of the Hebrew letters Lamed and Gimel, and together they have the numerical value of 33. “BaOmer" stands for “of the Omer." The Omer is the counting period that starts on the second day of Passover and comes to a head with the holiday of Shavuot, following day number 49.
Therefore, Lag BaOmer is the 33rd day of the Omer count, which also coincides with 18 Iyar. But why do we count the days? One reason is that Shavuot is the holiday when we received the Torah on Mount Sinai and we are excited and have waiting for it so that’s why we count the days. The days of counting the Omer are a mourning period for Jews. On the 33rd day, all the mourning customs stop for a day and you are allowed to celebrate. This day symbolizes when the Bar Kokhba revolt defeated the Roman Empire. The rebels light torches and bonfires to spread the word about the revolt and therefore, the most common custom is lighting of bonfires during Lag BaOmer.
Campfire desserts
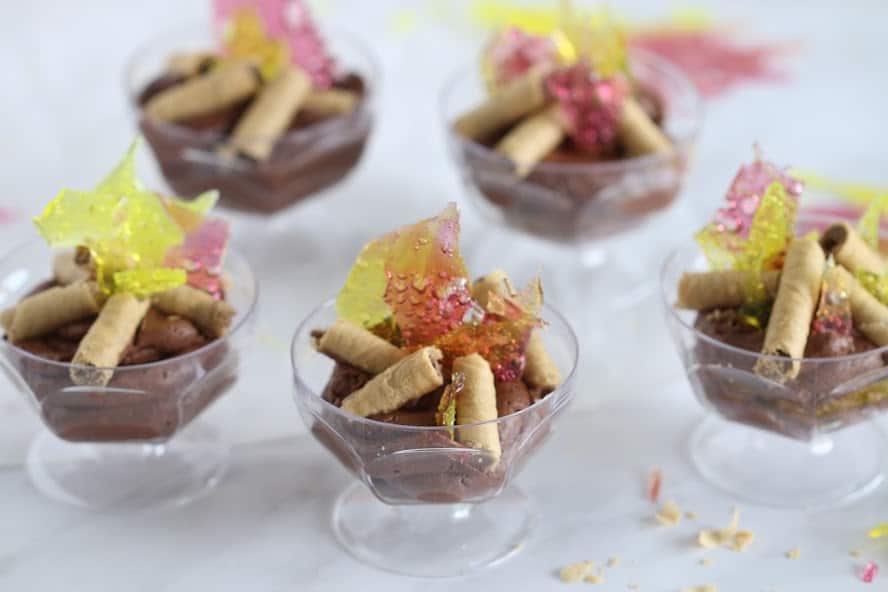
But enough about history, let’s talk about food. During Lag BaOmer, you usually cook potatoes and sweets, like marshmallows on a stick. However, I wanted something that was a bit more elegant. That’s why I made individual cups of chocolate mousse and you don't even really have it near the bonfire. My chocolate mousse has a bonfire design which I think is very festive ☺
The recipe is very simple to make (which is a common theme in my blog!) and you can make it parve using non-dairy whipping cream.
The decorations for the mousse are made from hard candies that I melted and broke to look like flames of fire and for the "wood", you can use pretzels or rolled wafer cookies. If you need a bigger dessert or you just don't want a cup dessert, you can also decorate a chocolate cake with these decorations.
Chocolate Mousse Dessert tips
Quality Ingredients
Opt for high-quality dark chocolate and fresh whipping cream to ensure the best flavor and texture for your chocolate mousse.
Proper Chocolate Melting
When melting the dark chocolate, use a gentle heat and stir frequently to prevent burning. You can melt it over a double boiler or in short bursts in the microwave, stirring in between until smooth.
Chill Well
Cooling the chocolate and cream mixture in the fridge for at least an hour allows it to set properly and makes it easier to whip into stiff peaks later.
Whipping Technique
Whip the chilled chocolate and cream mixture until it forms stiff peaks. Be patient during this process, as proper whipping is crucial for achieving the desired light and airy texture.
Piping Consistency
Transfer the whipped mousse into a piping bag for neat and uniform presentation. Ensure that the mousse is well chilled and firm enough to hold its shape when piped into cups or onto serving plates.
Creative Garnishes
Get creative with your garnishes to add visual appeal and additional flavor to your dessert. Consider using crushed hard candies for flames and pretzel sticks or rolled wafer cookies for a whimsical touch of "woods."
Temperature Control
Be cautious when baking the candies for garnish to create the flames. Keep a close eye on them to prevent burning, as melted candies can quickly go from perfect to scorched.
Serve Chilled
For the best taste and texture, serve the chocolate mousse dessert chilled. Letting it sit in the fridge for a while before serving allows the flavors to meld and intensify.
Make Ahead
You can prepare the chocolate mousse ahead of time and store it in the refrigerator until ready to serve. This makes it a convenient option for entertaining or special occasions.
FAQS
While dark chocolate is traditionally used for its rich flavor, you can certainly experiment with milk chocolate if you prefer a milder taste. Keep in mind that milk chocolate may result in a sweeter and less intense mousse.
Yes, you can use a hand mixer to whip the chocolate mousse mixture to stiff peaks. It may take a bit longer compared to a stand mixer, but it will achieve the same result.
Feel free to get creative with the garnishes! You can use a variety of toppings such as fresh berries, chocolate shavings, whipped cream, or toasted nuts to add flavor and visual appeal to the dessert.
Baking the candies creates a fun and visually striking garnish resembling flames. However, if you prefer, you can use other garnishes or skip this step altogether. Just ensure that any garnishes you use complement the flavor of the chocolate mousse.
Yes, you can prepare the chocolate mousse ahead of time and store it in the refrigerator until ready to serve. However, it's best to add the garnishes just before serving to maintain their texture and appearance.
The chocolate mousse will typically last for up to 2-3 days when stored properly in an airtight container in the refrigerator. Be sure to check for any signs of spoilage before consuming.
While it's possible to freeze chocolate mousse, the texture may change slightly upon thawing, becoming denser. If you choose to freeze it, place it in an airtight container and thaw it in the refrigerator overnight before serving.
Other recipes to try:
For all my chocolate recipes check out my chocolate recipe index.
Make this chocolate mousse dessert today!
Why wait for a special occasion when you can treat yourself to the sheer delight of this Chocolate Mousse Dessert right now? With just a handful of ingredients and straightforward instructions, you can whisk up this decadent dessert in no time. Treat yourself to the joy of indulgence and creativity by making this Chocolate Mousse Dessert right now. Your taste buds will thank you, and your senses will delight in the culinary adventure that awaits.
Chocolate Mousse Dessert
Ingredients
- 1 cup whipping cream
- 2 cups (8.8 oz. / 250 grams) dark chocolate
For garnish:
- 10 red / yellow / orange hard candies
- Pretzels sticks or rolled wafer cookies
Instructions
- In a small pot, place the whipping cream and bring to a light boil on high.
- Place the dark chocolate in a bowl.
- Pour the whipping cream on the chocolate and let it sit for 1-2 minutes.
- Mix the batter until it unifies and is smooth.
- Cool the batter in the fridge for 1 hour.
- In the bowl of a stand mixer, place the cold batter.
- Whip to stiff peaks with the whipping attachment.
- Transfer the mousse to a piping bag.
- Pipe the mousse in small cups.
- To create the flames, place a baking paper on a baking pan and set the oven to 160°C / 325°F with the fan.
- Unwrap the candies and place them in a small sandwich bag, crush them using a rolling pin.
- Spread the crushed hard candies on the baking pan and bake for 3-6 minutes.
- Look in the oven and see if the candies are melted, be careful not to burn them! (I recommend keeping an eye on the candies as they melt).
- Take the baking pan out of the oven and let the melted candies cool.
- Break the candies into small shapes of flames.
- Decorate each cup with "flames" and "woods".
- Enjoy!
Leave a Reply