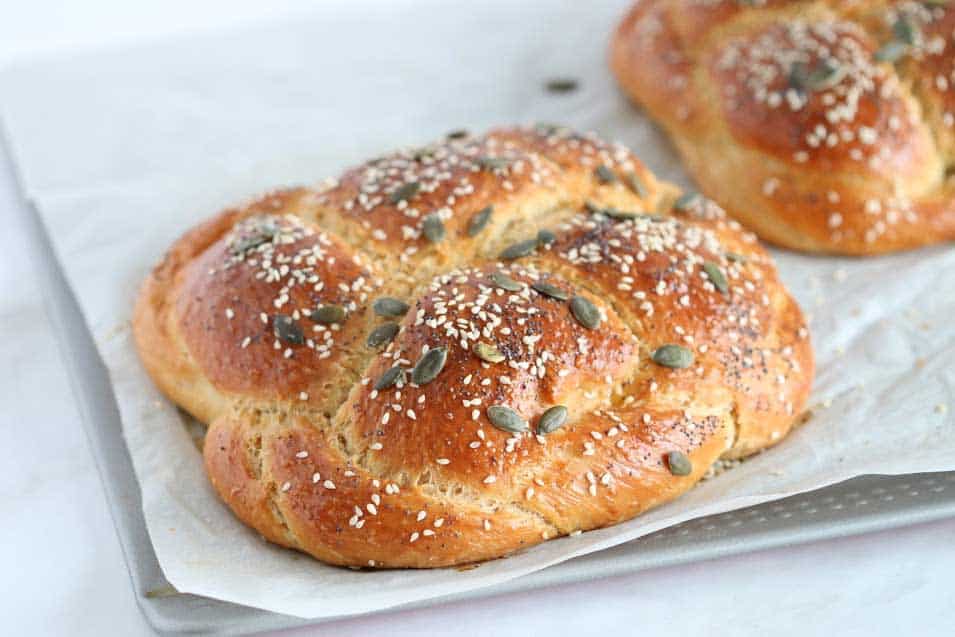
Embark on a culinary journey steeped in tradition with this exquisite Jewish Sweet Challah Bread recipe. Challah, a braided bread that holds deep significance in Jewish culture, is not merely a delightful treat but a symbol of unity and celebration. Challah is the traditional Jewish bread for Kiddush - Friday night evening dinners. This braided bread has a fluffy inside and delicious taste.

What is Challah bread?
Challah bread is traditional bread that’s whipped up for Friday evening dinners in the Jewish religion. You know the one; it looks like a braid and is fluffy on the inside. Or in other words, it’s a slice of heaven.
All you need are two pieces of bread (and for those who are religious, Jewish, then be sure to bless it). The bread itself is sometimes sweeter and gives a fun, tasty start for the heavy meal that comes straight after.
Challah Bread Recipe
This specific recipe I actually learned from my sister, as she is the one in charge of making Challah in our family for Friday dinner. I’m usually the one who makes the dessert 😉
The recipe requires rising time for the dough so if you are in a hurry, this is not the bread for you. If you have time and patience, then you will have super delicious and yummy bread to munch on!
This recipe I'm sharing here is my simple, sweet Challah.

Tips for Perfecting Your Jewish Sweet Challah Bread:
Measure Accurately
Precision in measuring ingredients is key to achieving the ideal texture and flavor. Therefore, use a kitchen scale for accurate measurements, especially for the flour, as different measuring methods can yield varying results.
Fresh Yeast
Ensure your yeast is fresh and active. Check the expiration date and proof the yeast in lukewarm water with a pinch of sugar before incorporating it into the dry ingredients. The mixture should become frothy, indicating that the yeast is active.
Kneading Technique
Allow the stand mixer to do the hard work during the kneading process, ensuring the dough is elastic and smooth. If kneading by hand, work the dough on a floured surface for about 8-10 minutes until it reaches the desired consistency.
Rising Time
Let the dough rise in a warm, draft-free environment. Cover the bowl with a damp cloth or plastic wrap to prevent the surface from drying out. The first rise is essential for developing flavor and texture, so be patient.
Braiding Expertise
If you're new to braiding challah, watch tutorial videos or practice with smaller portions of dough. In the video here down below you can see how I braid this 4 strands round challah. The braiding adds a beautiful touch to the bread and is an art in itself. Consider experimenting with different braiding styles for a unique presentation.
Egg Wash Technique
Brushing the challah with egg wash gives it a glossy finish. For a richer color, apply two coats of egg wash, allowing the first layer to dry slightly before applying the second. This step also helps the seeds adhere.
Seed Garnish
Customize the seed garnish based on your preferences. Sesame, poppy, and pumpkin seeds contribute not only to the visual appeal but also to the overall flavor profile. Experiment with combinations or choose your favorite for a personal touch.
Oven Monitoring
Keep a close eye on the challah as it bakes, especially after the 40-minute mark. If the bread appears golden brown and sounds hollow when tapped on the bottom, it's ready. Over-baking can result in a dry loaf.
Cooling Properly
Allow the challah to cool on a wire rack before slicing. As a result, this prevents the bottom from becoming soggy and ensures a uniform texture throughout.
Storage
To maintain freshness, store the challah in airtight bags or containers once completely cooled. Optionally, freeze portions for later use, ensuring they are well-wrapped to prevent freezer burn.

FAQS
Yes, you can substitute active dry yeast for instant dry yeast. However, you may need to activate it in lukewarm water with a pinch of sugar before incorporating it into the dry ingredients.
Absolutely! While the recipe suggests vegetable oil or olive oil, you can experiment with other oils like canola or sunflower oil. Each oil will impart its unique flavor to the challah.
The dough should roughly double in size during the first rise, which usually takes about an hour. You can perform the "poke test" by gently pressing two fingers into the dough; if the indentation remains, the dough is ready.
Yes, you can refrigerate the dough after the first rise. This can enhance the flavor and make the baking process more convenient. Just let the dough come to room temperature before shaping and proceeding with the second rise.
Yes, you can freeze the dough after the first rise. Divide it into portions, wrap each portion tightly in plastic wrap, and place them in a freezer-safe bag. Thaw the dough in the refrigerator before shaping and baking.
Avoid overbaking the challah, and make sure to store it properly. If you find that your challah is drying out, consider placing a slice of bread in the storage container to help maintain moisture.
Absolutely! You can divide the dough into smaller portions to create individual-sized challahs. Adjust the baking time accordingly, as smaller loaves will bake faster.
Feel free to get creative with the garnish. If you're not a fan of seeds, you can use chopped nuts, dried fruit, or simply go without. The egg wash alone will give the challah a beautiful golden finish.
Yes, you can knead the dough by hand. It will require a bit more effort and time, but the results can be just as rewarding. Knead the dough on a floured surface until it becomes elastic and smooth.
Challah is best enjoyed within a day or two of baking. Store it in an airtight container or plastic bag at room temperature. If you have leftovers, consider toasting or using them for French toast or bread pudding.
Other challah recipes on my blog:
Whole wheat challah
Sweet potato challah
Vegan challah (Water Challah)
Beet challah
Apple Cinnamon Rosh Hashanah Challah
Rainbow challah
Need an idea for leftover Challah bread? I have the perfect French toast recipe, check it out!
You must use the category slug, not a URL, in the category field.Bake challah today!
After baking, your Sweet Challah Bread emerges, a golden-brown testimony to your culinary prowess. Additionally, as the aroma envelops your kitchen, envision the delight of serving these artisanal creations. It's a gesture that extends a heartfelt "Shabbat Shalom" to all who gather around your table. Furthermore, dive into the rich tradition and savor each moment as you share this delightful Sweet Challah Bread with your loved ones.

Jewish Sweet Bread Challah
Ingredients
- 4 cups (500 grams) all-purpose flour
- 1½ tablespoon dry yeast
- ¼ cup sugar
- 1 teaspoon salt
- 1¼ cups lukewarm water
- 1 egg
- ⅓ cup any vegetable oil - I like to use olive oil
For garnish:
- 1 egg beaten - egg wash
- 2 tablespoon sesame seeds
- 2 tablespoon pumpkin seeds
- 2 tablespoon poppy seeds
Instructions
- Mix all of the dry ingredients, except for the salt, in the stand mixer bowl.
- Attach the kneading hook and mix on slow speed.
- Gradually add oil, water, and egg while mixing.
- Add salt and knead for 4 minutes until dough is unified.
- Form the dough into a ball shape and let this rise in a greased bowl for an hour.
- Divide the dough into 2 pieces and let this rise again for half an hour.
- Divide each pieces to smaller pieces and create strands to braid the challah.
- Braid the strands to challahs. (In the pictures I made round challahs from 4 strands each. Watch the video below to see how to braid a 4 strands round challah)
- Heat the oven to 160°C / 325°F degrees with no fan - upper and lower heat.
- Brush the 2 braided challahs with the egg wash and let this rise again for another half an hour - if you are in a hurry, you can skip this step.
- Make another layer of egg wash and sprinkle all of the garnish seeds.
- Bake for 40-50 minutes –but pay attention after 40 minutes if the bread looks very golden then take them out of the oven!
- Serve and Shabbat Shalom!
Video


Leave a Reply